MongoDB Realm Documentaion을 보고 정리한 내용입니다.
이를 바탕으로 MongoDB Realm을 이용한 iOS 앱을 만들 것입니다.
따라서 iOS 개발 관련 부분만 정리할 예정입니다.
MongoDB Realm Documentation 중 현재 포스트의 부분은 아래와 같습니다.
MongoDB Realm - Tutorial - iOS with Swift
iOS Swift Tutorial — MongoDB Realm
The realm-tutorial-ios-swift repository contains two branches: final and start. The final branch is a finished version of the app as it should look after you complete this tutorial. To walk through this tutorial, please check out the start branch:
docs.mongodb.com
[iOS - MongoDB Realm] 포스트
[iOS - MongoDB Realm] 1. MongoDB Realm
[iOS - MongoDB Realm] 2. Get Started - Introduction to MongoDB Realm for Mobile Developers
[iOS - MongoDB Realm] 3. Tutorial - Create a Task Tracker App - iOS Swift Tutorial
[iOS - MongoDB Realm] 3-1. Tutorial - Set up the Task Tracker Tutorial Backend
[iOS - MongoDB Realm] 3-2. Tutorial - iOS Swift Tutorial
next
iOS Swift 튜토리얼
개요
이 튜토리얼에서는 사용자가 다음을 수행할 수 있는 Task Tracker 앱을 만듭니다.
- 이메일과 비밀번호로 등록하세요.
- 이메일과 비밀번호로 계정에 로그인하고 나중에 로그 아웃합니다.
- 자신이 속한 프로젝트 목록을 봅니다.
- 프로젝트에서 작업을 보고, 만들고, 수정하고, 삭제합니다.
- 프로젝트의 팀 구성원 목록을 봅니다.
- 프로젝트에 팀 구성원을 추가하고 제거합니다.
약 30 분 정도 소요됩니다.
* 빠른 시작
튜토리얼을 따르지 않고 직접 탐색하려면 1. iOS 빠른 시작을 확인하십시오.
복사 가능한 코드 예제와 MongoDB Realm 애플리케이션을 설정하는 데 필요한 필수 정보가 포함되어 있습니다.
혹시 SwiftUI와 Combine을 사용하십니까? 2. SwiftUI 및 Combine으로 빠른 시작을 확인하십시오.
1. iOS 빠른 시작만 정리할 예정입니다.
전제 조건
시작하기 전에 다음이 있는지 확인하십시오.
- Xcode version 11.0 or higher, which requires macOS 10.14.4 or higher.
- Target of iOS 13.0.
- CocoaPods 1.10.0 or later.
- Set up the backend.
모바일 앱 설정
1. 클라이언트 앱 리포지토리 복제
필요한 대부분의 코드가 포함된 Task Tracker iOS 애플리케이션을 이미 준비했습니다.
GitHub에서 직접 클라이언트 애플리케이션 저장소를 복제할 수 있습니다.
git clone https://github.com/mongodb-university/realm-tutorial-ios-swift.git
* 중요
realm-tutorial-ios-swift 저장소에는 final, start의 두 개의 브랜치가 포함되어 있습니다.
final 브랜치는 완성된 버전이고, 이 튜토리얼을 살펴보려면 start 브랜치를 확인하십시오.
git checkout start
터미널에서 다음 명령을 실행하여 Task Tracker 클라이언트 애플리케이션으로 이동하고 CocoaPods와 함께 종속성을 설치합니다.
* 중요
Realm을 설치하려면 CocoaPods 최소 버전 1.10이 필요합니다.
CocoaPods에 대해 알고싶다면 아래 포스팅을 참고해주세요.
[Xcode] CocoaPods(코코아팟) 사용법
cd realm-tutorial-ios-swift
pod install --repo-update
설치가 완료되면 Xcode를 사용하여 모든 종속성이 구성된 CocoaPods에서 생성한 xcworkspace를 엽니다.
명령 줄에서 이 작업을 수행할 수 있습니다.
open "Task Tracker.xcworkspace"
Github에서 Task Tracker 프로젝트를 내려 받고,
튜토리얼을 설명을 보면서 프로젝트의 TODO 주석 부분이 있는 적절한 곳에
주어진 코드를 입력하며 전체 프로젝트를 완성하면 된다.
2. 앱 구조 살펴보기
Xcode 프로젝트 네비게이터에서 Task Tracker폴더 에있는 Task Tracker 응용 프로그램의 소스 파일을 볼 수 있습니다.
관련 파일은 다음과 같습니다.
| File | Purpose |
| Models.swift | 이 앱에서 사용하는 Realm 객체 모델을 정의합니다. |
| SceneDelegate.swift | 앱의 다른 부분에서 사용하는 전역 Realm 앱 인스턴스를 선언합니다. |
| WelcomeViewController.swift | 로그인 및 사용자 등록 기능을 구현합니다. |
| ProjectsViewController.swift | 로그인 한 사용자가 구성원인 프로젝트 목록입니다. |
| TasksViewController.swift | 주어진 프로젝트의 작업 목록입니다. |
| ManageTeamController.swift | 프로젝트의 팀 구성원 목록 및 관련 팀 관리 제어. |
3. MongoDB Realm 앱에 연결
백엔드에서 앱을 작동시키려면 먼저 Realm App ID를 SceneDelegate.swift 파일에 추가해야 합니다.
SceneDelegate.swift 파일은 global Realm App 인스턴스를 선언합니다.
(3-1 포스트에서 Realm 백엔드를 설정하고 얻은 Realm App ID를 사용하면 됩니다.)
let app = App(id: "tasktracker-qczfq")
Realm App ID 값인 id값을 변경하고 싶다면 find in the Realm UI를 참고하세요.
4. 객체 모델 정의
Models.swift 파일로 이동하여이 앱에서 사용되는 Realm 객체 모델을 구현하세요.
먼저 다른 프로젝트에서 사용자의 멤버십에 대한 정보를 포함할 User 모델을 구현하십시오.
Realm 객체 모델은 RealmSwift 라이브러리에서 Object로부터 파생되며, 이를 통해 Realm Database에 저장할 수 있습니다.
class User: Object {
    @objc dynamic var _id: String = ""
    @objc dynamic var _partition: String = ""
    @objc dynamic var name: String = ""
    let memberOf = RealmSwift.List<Project>()

    override static func primaryKey() -> String? {
        return "_id"
    }
}
* 노트 : iOS 애플리케이션에서 Realm 오브젝트 모델을 사용하는 방법에 대한 자세한 내용은 iOS 클라이언트 가이드의 Realm 오브젝트를 참조하십시오.
다음으로 User가 구성원인 프로젝트를 나타내는 Project 객체를 구현합니다.
(Next, implement the Project embedded object that represents a Project that a User is a member of:)
class Project: EmbeddedObject {
    @objc dynamic var name: String? = nil
    @objc dynamic var partition: String? = nil
    convenience init(partition: String, name: String) {
        self.init()
        self.partition = partition
        self.name = name
    }
}
마지막으로 Task 클래스를 Realm 객체 모델로 바꿔 보겠습니다.
// TODO: Realm-ify Task model
class Task: Object {
    @objc dynamic var _id: ObjectId = ObjectId.generate()
    @objc dynamic var _partition: String = ""
    @objc dynamic var name: String = ""
    @objc dynamic var owner: String?
    @objc dynamic var status: String = ""
    override static func primaryKey() -> String? {
        return "_id"
    }

    var statusEnum: TaskStatus {
        get {
            return TaskStatus(rawValue: status) ?? .Open
        }
        set {
            status = newValue.rawValue
        }
    }

    convenience init(partition: String, name: String) {
        self.init()
        self._partition = partition
        self.name = name
    }
}
5. 인증 활성화
모든 로그인 및 사용자 등록 로직을 구현하는 WelcomeViewController.swift 파일로 이동합니다.
이 컨트롤러에서는 이메일 및 비밀번호를 위한 텍스트 필드, 로그인 및 가입 버튼, 앱이 인증 요청을 처리할 때 표시되는 활동 표시기(activity indicator)가 설정됩니다.
먼저 Realm 앱의 이메일 / 비밀번호 인증 공급자를 사용하여 새 사용자를 등록하는 signUp() 메서드를 구현해 보겠습니다.
@objc func signUp() {
    setLoading(true);
    app.emailPasswordAuth.registerUser(email: email!, password: password!, completion: { [weak self](error) in
        // Completion handlers are not necessarily called on the UI thread.
        // This call to DispatchQueue.main.async ensures that any changes to the UI,
        // namely disabling the loading indicator and navigating to the next page,
        // are handled on the UI thread:
        DispatchQueue.main.async {
            self!.setLoading(false);
            guard error == nil else {
                print("Signup failed: \(error!)")
                self!.errorLabel.text = "Signup failed: \(error!.localizedDescription)"
                return
            }
            print("Signup successful!")
            // Registering just registers. Now we need to sign in, but we can reuse the existing email and password.
            self!.errorLabel.text = "Signup successful! Signing in..."
            self!.signIn()
        }
    })
}
이제 이메일 / 비밀번호 자격 증명을 사용하여 기존 사용자로 로그인하는 signIn() 메서드를 구현합니다.
성공적으로 로그인되면 사용자 realm을 열고 ProjectsViewController로 이동합니다.
@objc func signIn() {
    print("Log in as user: \(email!)");
    setLoading(true);
    app.login(credentials: Credentials.emailPassword(email: email!, password: password!)) { [weak self](result) in
        // Completion handlers are not necessarily called on the UI thread.
        // This call to DispatchQueue.main.async ensures that any changes to the UI,
        // namely disabling the loading indicator and navigating to the next page,
        // are handled on the UI thread:
        DispatchQueue.main.async {
            self!.setLoading(false);
            switch result {
            case .failure(let error):
                // Auth error: user already exists? Try logging in as that user.
                print("Login failed: \(error)");
                self!.errorLabel.text = "Login failed: \(error.localizedDescription)"
                return
            case .success(let user):
                print("Login succeeded!");

                // Load again while we open the realm.
                self!.setLoading(true);

                // Get a configuration to open the synced realm.
                var configuration = user.configuration(partitionValue: "user=\(user.id)")

                // Only allow User objects in this partition.
                configuration.objectTypes = [User.self, Project.self]

                // Open the realm asynchronously so that it downloads the remote copy before
                // opening the local copy.
                Realm.asyncOpen(configuration: configuration) { [weak self](result) in
                    DispatchQueue.main.async {
                        self!.setLoading(false);
                        switch result {
                        case .failure(let error):
                            fatalError("Failed to open realm: \(error)")
                        case .success(let userRealm):
                            // Go to the list of projects in the user object contained in the user realm.
                            self!.navigationController!.pushViewController(ProjectsViewController(userRealm: userRealm), animated: true);
                        }
                    }
                }
            }
        }
    };
}
6. 프로젝트 목록 구현 - ProjectsViewController.swift
ProjectsViewController.swift 파일을 엽니다.
여기에서 사용자가 속한 프로젝트 목록이 표시됩니다.
WelcomeViewController가 사용자 realm을 열어 이 컨트롤러에 전달했습니다.
다음 화면으로 전환하기 전에 realm을 완전히 다운로드할 수 있으므로 이는 좋은 방법입니다.
어떤 이유로 realm을 열지 못한 경우, 오류는 원래 화면에서 처리될 수 있으며 전환을 실행 취소할 필요가 없습니다.
사용자 realm에 최대 하나의 개체, 즉 사용자 지정 데이터 객체만(The user custom data object) 포함되도록 앱을 설계했습니다.
인증 트리거가 이 사용자 객체를 생성하기 때문에 realm은 계정을 생성 한 직후에 객체를 포함하지 않을 수 있습니다.
따라서 realm 자체에서 변경 사항을 확인해야 합니다.
// There should only be one user in my realm - that is myself
let usersInRealm = userRealm.objects(User.self)
notificationToken = usersInRealm.observe { [weak self, usersInRealm] (changes) in
    self?.userData = usersInRealm.first
    guard let tableView = self?.tableView else { return }
    tableView.reloadData()
}

realm, collection 또는 object를 관찰할 때마다, 해당 객체를 계속 관찰하기 위해 유지해야 하는 알림 토큰을 받습니다.
(Whenever we observe a realm, collection, or object, we receive a notification token that we must retain as long as we want to keep observing that object.)
예를 들어 사용자가 다른 화면으로 이동해 관찰이 완료된다면 해당 토큰을 무효화해야 합니다.
그렇게 하기 위한 한 가지 편리한 장소는 ViewController의 deinit 메서드입니다.
deinit {
    // Always invalidate any notification tokens when you are done with them.
    notificationToken?.invalidate()
}
다음으로 사용자가 로그 아웃하고 WelcomeViewController로 돌아갈 수 있는 방법을 제공하겠습니다.
이 viewDidLoad() 메서드는 뷰 맨 위에 있는 로그 아웃 버튼을 logOutButtonDidClick() 메서드에 연결합니다.
logOutButtonDidClick()는 다음과 같이 구현할 수 있습니다.
@objc func logOutButtonDidClick() {
    let alertController = UIAlertController(title: "Log Out", message: "", preferredStyle: .alert);
    alertController.addAction(UIAlertAction(title: "Yes, Log Out", style: .destructive, handler: {
        alert -> Void in
        print("Logging out...");

        app.currentUser?.logOut() { (error) in
            DispatchQueue.main.async {
                print("Logged out!");
                self.navigationController?.popViewController(animated: true)
            }
        }

    }))
    alertController.addAction(UIAlertAction(title: "Cancel", style: .cancel, handler: nil))
    self.present(alertController, animated: true, completion: nil)
}
ProjectsViewController는 자체 목록에 대한 UITableViewDelegate 프로토콜을 구현하므로 아래와 같은 tableView 메서드를 구현해 보겠습니다. (ProjectsViewController를 tableView로 구현하기 위해서 메서드 작성할 거란 뜻)
먼저 tableView(_:numberOfRowsInSection:)에서 현재 사용자에게 사용 가능한 프로젝트 수를 반환하는 메서드를 구현합니다.
사용자는 항상 자신의 프로젝트에 액세스 할 수 있으므로 사용자 객체를 아직 사용할 수 없는 경우에도 항상 1 개 이상을 반환합니다.
func tableView(_ tableView: UITableView, numberOfRowsInSection section: Int) -> Int {
    // You always have at least one project (your own)
    return userData?.memberOf.count ?? 1
}
다음으로 tableView(_:cellForRowAt:)에 각 셀에 대한 프로젝트 정보를 입력합니다.
다시 말하지만, 사용자 개체가 아직 로드되지 않은 경우에도 사용자 자신의 프로젝트가 항상 목록에 있음을 기억합시다.
func tableView(_ tableView: UITableView, cellForRowAt indexPath: IndexPath) -> UITableViewCell {
    let cell = tableView.dequeueReusableCell(withIdentifier: "Cell") ?? UITableViewCell(style: .default, reuseIdentifier: "Cell")
    cell.selectionStyle = .none

    // User data may not have loaded yet. You always have your own project.
    let projectName = userData?.memberOf[indexPath.row].name ?? "My Project"
    cell.textLabel?.text = projectName

    return cell
}
마지막으로 tableView(_:didSelectRowAt:)에서 사용자가 목록에서 프로젝트를 클릭할 때 발생하는 작업을 처리하는 메서드를 구현합니다.
ProjectsViewController로 이동하기 전에 WelcomeViewController에서 사용자 realm을 열었으므로 TasksViewController로 이동하기 전에 프로젝트 realm을 열 것입니다.
func tableView(_ tableView: UITableView, didSelectRowAt indexPath: IndexPath) {
    let user = app.currentUser!
    let project = userData?.memberOf[indexPath.row] ?? Project(partition: "project=\(user.id)", name: "My Project")

    Realm.asyncOpen(configuration: user.configuration(partitionValue: project.partition!)) { [weak self] (result) in
        switch result {
        case .failure(let error):
            fatalError("Failed to open realm: \(error)")
        case .success(let realm):
            self?.navigationController?.pushViewController(
                TasksViewController(realm: realm, title: "\(project.name!)'s Tasks"),
                animated: true
            );
        }
    }
}
7. 작업 목록 구현 - TasksViewController.swift
TasksViewController.swift 파일로 이동하여 프로젝트에서 작업 목록을 구현합니다.
TasksViewController 클래스는 Task 객체의 배열을 보유합니다.
우리는 이미 Task 클래스를 Realm 객체 모델로 변환했습니다.
Realm에 포함된 Realm 객체의 라이브 컬렉션을(live collection of Realm objects) 보유하려면 RealmResults를 표준 Swift 배열 대신 사용해야 합니다.
이제 해당 속성을 변환해 보겠습니다.
let tableView = UITableView()
let partitionValue: String
let realm: Realm
var notificationToken: NotificationToken?
let tasks: Results<Task>
ProjectsViewController에서 전달된 프로젝트 realm에 대한 쿼리로 tasks 속성을 초기화할 수 있습니다.
라이브 작업 컬렉션이(live tasks collection) 있으면 변경 사항을 관찰할 수 있습니다.
required init(realm: Realm, title: String) {
    // Ensure the realm was opened with sync.
    guard let syncConfiguration = realm.configuration.syncConfiguration else {
        fatalError("Sync configuration not found! Realm not opened with sync?");
    }

    self.realm = realm

    // Partition value must be of string type.
    partitionValue = syncConfiguration.partitionValue!.stringValue!

    // Access all tasks in the realm, sorted by _id so that the ordering is defined.
    tasks = realm.objects(Task.self).sorted(byKeyPath: "_id")

    super.init(nibName: nil, bundle: nil)

    self.title = title

    // Observe the tasks for changes. Hang on to the returned notification token.
    notificationToken = tasks.observe { [weak self] (changes) in
        guard let tableView = self?.tableView else { return }
        switch changes {
        case .initial:
            // Results are now populated and can be accessed without blocking the UI
            tableView.reloadData()
        case .update(_, let deletions, let insertions, let modifications):
            // Query results have changed, so apply them to the UITableView.
            tableView.performBatchUpdates({
                // It's important to be sure to always update a table in this order:
                // deletions, insertions, then updates. Otherwise, you could be unintentionally
                // updating at the wrong index!
                tableView.deleteRows(at: deletions.map({ IndexPath(row: $0, section: 0) }),
                    with: .automatic)
                tableView.insertRows(at: insertions.map({ IndexPath(row: $0, section: 0) }),
                    with: .automatic)
                tableView.reloadRows(at: modifications.map({ IndexPath(row: $0, section: 0) }),
                    with: .automatic)
            })
        case .error(let error):
            // An error occurred while opening the Realm file on the background worker thread
            fatalError("\(error)")
        }
    }
}
observeRealm 객체를 호출하면 notificationToken이 반환됩니다.
관찰이 완료되기를 바라는 한 항상 notificationToken을 유지하십시오.
관찰이 완료되면 (예 : 사용자가 이 view에서 벗어난 경우) 토큰을 무효화해야 합니다.
deinit 메서드는 그렇게 할 수 있는 좋은 장소입니다 :
deinit {
    // Always invalidate any notification tokens when you are done with them.
    notificationToken?.invalidate()
}
TasksViewController는 이미 목록에 있는 Tasks를 이용해 UI를 채웁니다.
tableView(_:numberOfRowsInSection:)및 tableView(_:cellForRowAt:) 메서드에서 Task 클래스의 realm 객체 모델 버전과 RealmResults 객체가 클래스와 배열에서 각각 어떻게 drop-in replacements 되는지 확인하세요.
이 메서드들은 변경할 필요가 없습니다.
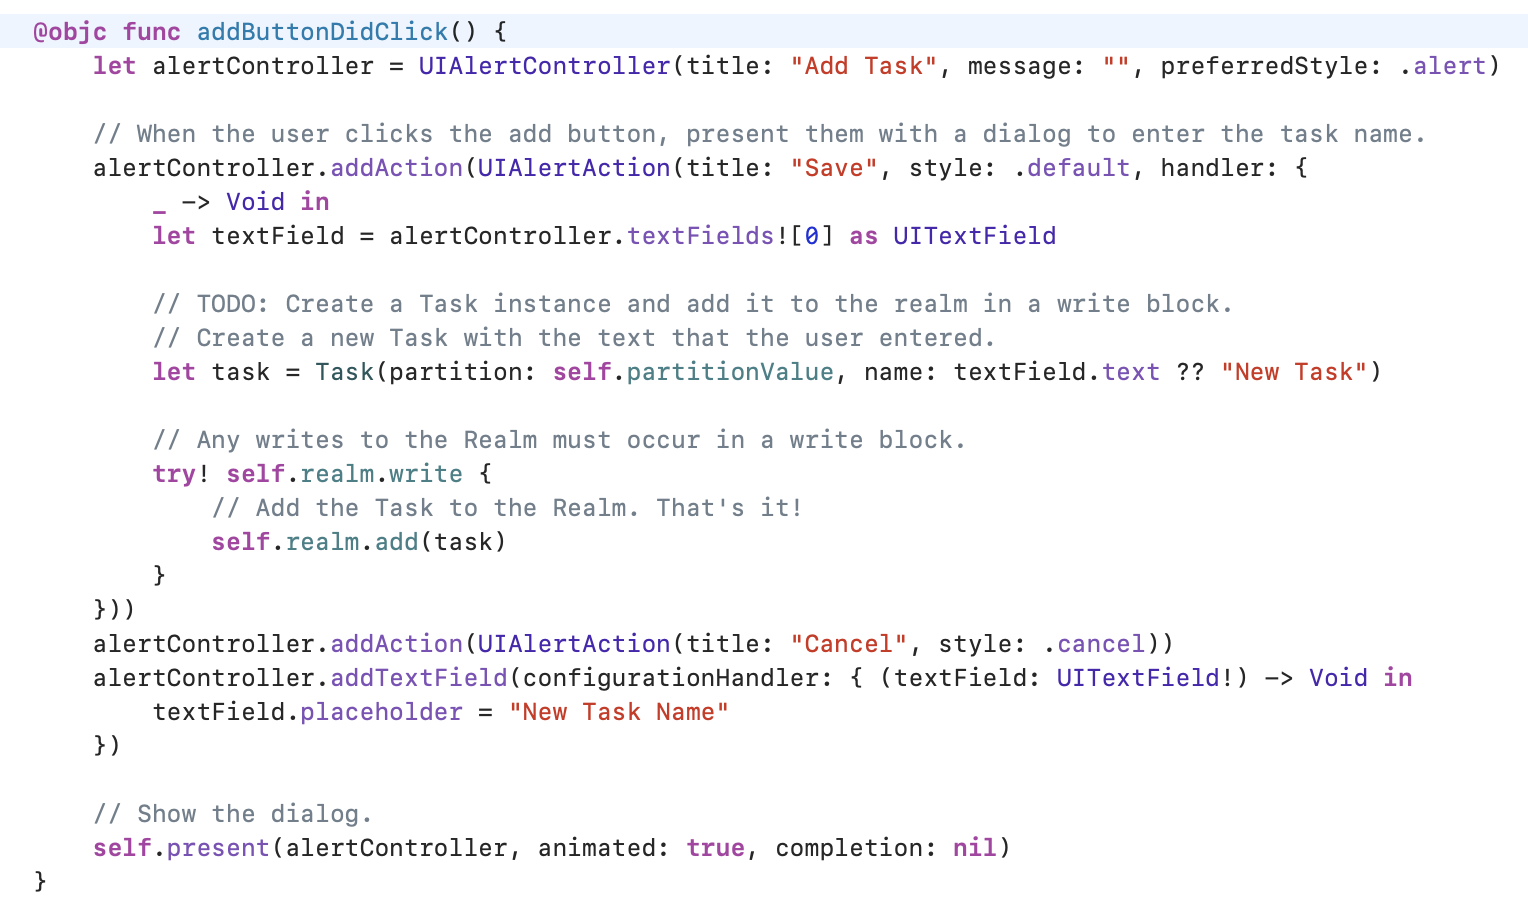
TasksViewController는 또한 뷰 상단의 Add 버튼을 addButtonDidClick() 메서드에 연결합니다.
Task 생성을 아래와 같은 메서드로 구현할 수 있습니다. 이 방법으로 태스크 생성을 구현할 수 있습니다.
// Create a new Task with the text that the user entered.
let task = Task(partition: self.partitionValue, name: textField.text ?? "New Task")

// Any writes to the Realm must occur in a write block.
try! self.realm.write {
    // Add the Task to the Realm. That's it!
    self.realm.add(task)
}
사용자가 목록에서 작업(Task)을 선택하면 작업 상태를 업데이트할 수 있는 작업 시트가 제공됩니다.
tableView(_:didSelectRowAt:) 메서드를 아래와 같이 구현하세요.
// If the task is not in the Open state, we can set it to open. Otherwise, that action will not be available.
// We do this for the other two states -- InProgress and Complete.
if (task.statusEnum != .Open) {
    actionSheet.addAction(UIAlertAction(title: "Open", style: .default) { _ in
            // Any modifications to managed objects must occur in a write block.
            // When we modify the Task's state, that change is automatically reflected in the realm.
            try! self.realm.write {
                task.statusEnum = .Open
            }
        })
}

if (task.statusEnum != .InProgress) {
    actionSheet.addAction(UIAlertAction(title: "Start Progress", style: .default) { _ in
            try! self.realm.write {
                task.statusEnum = .InProgress
            }
        })
}

if (task.statusEnum != .Complete) {
    actionSheet.addAction(UIAlertAction(title: "Complete", style: .default) { _ in
            try! self.realm.write {
                task.statusEnum = .Complete
            }
        })
}
스와이프 작업 삭제(swipe 해서 delete 하는 것)를 수행하기 위해서 tableView(_:commit:forRowAt:) 메서드를 구현합니다.
func tableView(_ tableView: UITableView, commit editingStyle: UITableViewCell.EditingStyle, forRowAt indexPath: IndexPath) {
    guard editingStyle == .delete else { return }

    // User can swipe to delete items.
    let task = tasks[indexPath.row]

    // All modifications to a realm must happen in a write block.
    try! realm.write {
        // Delete the Task.
        realm.delete(task)
    }
}
마지막으로 사용자는 자신의 프로젝트 팀을 관리할 수 있습니다.
UI를 설정할 때 TasksViewController는 isOwnTasks() 메서드를 사용하여 작업 표시 줄에 "팀 관리"작업을 추가할지 여부를 결정합니다.
다음과 같이 구현할 수 있습니다.
// Returns true if these are the user's own tasks.
func isOwnTasks() -> Bool {
    return partitionValue == "project=\(app.currentUser!.id)"
}
8. Manage Team View 구현
사용자는 Manage Team 뷰를 사용하여 자신의 프로젝트에 팀 구성원을 추가하고 제거할 수 있습니다.
클라이언트 측에서는 액세스 관리를 처리할 수 없으므로 앞서 정의한 Realm 함수를 호출해야 합니다.
사용자가 TasksViewController에서 "팀 관리"조치를 클릭할 때 팝업 되는 보기를 정의하는 ManageTeamViewController.swift 파일로 이동하십시오.
ManageTeamViewController는 fetchTeamMembers() 메서드를 팀 구성원 목록을 가져오는 데 사용합니다.
팀 구성원 목록을 반환하고 성공적으로 반환되면 목록을 새로 고침 하는 getMyTeamMembers 함수를 추가하세요.
// Calls a Realm function to fetch the team members and adds them to the list
func fetchTeamMembers() {
    // Start loading indicator
    activityIndicator.startAnimating()
    let user = app.currentUser!

    user.functions.getMyTeamMembers([]) { [weak self](result, error) in
        DispatchQueue.main.async {
            guard self != nil else {
                // This can happen if the view is dismissed
                // before the operation completes
                print("Team members list no longer needed.");
                return
            }
            // Stop loading indicator
            self!.activityIndicator.stopAnimating()
            guard error == nil else {
                print("Fetch team members failed: \(error!.localizedDescription)")
                return
            }
            print("Fetch team members complete.")

            // Convert documents to members array
            self!.members = result!.arrayValue!.map({ (bson) in
                return Member(document: bson!.documentValue!)
            })

            // Notify UI of changed data
            self!.tableView.reloadData()
        }
    }
}
ManageTeamViewController는 추가 버튼과 스와이프 삭제 기능을 addTeamMember()과 removeTeamMember() 메서드에 연결합니다.
이 addTeamMember() 메서드는 addTeamMemberRealm 함수를 호출하고, onTeamMemberOperationComplete() 메서드를 완료 핸들러로 사용할 수 있습니다.
func addTeamMember(email: String) {
    print("Adding member: \(email)")
    activityIndicator.startAnimating()

    let user = app.currentUser!

    user.functions.addTeamMember([AnyBSON(email)], self.onTeamMemberOperationComplete)
}
이 removeTeamMember() 메서드는 removeTeamMemberRealm 함수를 호출하고, onTeamMemberOperationComplete() 메서드를 완료 핸들러로 사용합니다.
func removeTeamMember(email: String) {
    print("Removing member: \(email)")
    activityIndicator.startAnimating()

    let user = app.currentUser!

    user.functions.removeTeamMember([AnyBSON(email)], self.onTeamMemberOperationComplete)
}
onTeamMemberOperationComplete() 메서드는 사용자에게 오류를 표시하고 구성원 목록을 새로 고칩니다.
9. 실행 및 테스트
코드를 완료하면 앱을 실행하고 기능을 확인할 수 있습니다.
Xcode 에서 실행 버튼을 클릭합니다.
앱이 성공적으로 빌드되면 앱에서 시도할 수 있는 몇 가지 작업은 다음과 같습니다.
- first@example.com 이메일로 사용자 만들기
- 앱을 탐색 한 다음 로그 아웃하거나 다른 장치 또는 시뮬레이터에서 앱의 두 번째 인스턴스를 시작합니다.
- second@example.com 이메일로 다른 사용자 만들기
- second@example.com의 프로젝트로 이동
- 일부 작업 추가, 업데이트 및 제거
- "팀 관리"를 클릭합니다.
- 팀에 first@example.com 추가
- 로그 아웃하고 first@example.com으로 로그인하십시오.
- 프로젝트 목록에서 두 개의 프로젝트 보기
- second@example.com의 프로젝트로 이동
- 몇 가지 새로운 작업을 추가, 업데이트 및 제거하여 공동 작업
* 팁 : 작동하지 않는 것이 있으면 final이 저장소의 분기를 확인하여 완성된 솔루션과 코드를 비교할 수 있습니다.
What's Next?
- iOS SDK 문서를 읽어보세요.
- MongoDB Realm 백엔드 튜토리얼을 사용해보십시오.
- MongoDB 개발자 허브에서 개발자 지향 블로그 게시물 및 통합 자습서를 찾아보십시오.
- MongoDB 커뮤니티 포럼에 가입하여 다른 MongoDB 개발자 및 기술 전문가로부터 배우십시오.

댓글